
I recently polled all of you about what recipes you wanted to see copycat versions of. Many of you asked for homemade wheat thins. I used to love them myself, but have not bought them in a very long time. So here are some homemade wheat thins.
I found the ingredient list on Fooducate’s website. Here is what is in the Garden Veggie version.
whole grain wheat flour, enriched bleached flour (wheat flour, niacin, reduced iron, thiamine mononitrate {vitamin b1}, riboflavin {vitamin b2}, folic acid), soybean oil, modified cornstarch, sugar, oat fiber, dried vegetable blend (carrots, onions, cabbage, tomato, green and red bell peppers), salt, leavening (calcium phosphate and/or baking soda), onion powder, parsley, garlic powder, hydrolyzed corn protein, torula yeast, brewer’s yeast, cornstarch, malted barley flour, natural flavor. bht added to packaging material to preserve freshness.
Wow! That is a lot of ingredients! I have highlighted some of the worst ones. My recipe is so easy and made from only real ingredients. I personally think it tastes better too. I made mine with wheat flour because I was trying to keep it close to the real thing. If you want to do a gluten free version, you can use gluten free flour and add an extra egg. I think it would work well. I love this recipe because you can create your own flavors. Just add in the extra herbs! These, along with my Peach Fruit Leathers, would be great for school lunch boxes.
Homemade Wheat Thins
Homemade Wheat Thins
Ingredients
- 2 1/2 cups white whole wheat flour (!For a gluten free version, sub GF all purpose or GF oat flour and add an extra egg)
- 1/4-1/3 cup raw honey (depending on how sweet you want them)
- 1/4 cup coconut oil (measure after melting)
- 1/4 cup applesauce (unsweetened)
- 1 tsp salt
- 1/2 tsp baking soda
- 1 flax egg
- 1/4 cup almond milk
- Optional add ins: basil, parsley, oregano, rosemary, thyme
Instructions
- Preheat oven to 350.
- Mix all the dry ingredients in one bowl .
- Mix wet in another.
- Add wet to dry and mix until combined.
- Gather the dough into a ball and wrap it with plastic.
- Stick it in the fridge for about 10-15 minutes so it gets a bit more firm.
- Once it’s firm, cut the dough in half with a bench scraper .
- Tear two pieces of parchment to line your baking bans. You can also use a silpat .
- Roll out half the dough by placing the ball on top of one sheet of parchment paper, and the plastic wrap between the dough and the rolling pin . This will let you roll the dough out very thin without it sticking the rolling pin , or the counter. It also makes for easy transfer to the baking sheet.
- Roll the dough out very thin. Try to roll it out in an even square if possible.
- Once the dough is rolled out, score it with a pizza cutter . I cut mine into bite sized squares. This will make the pieces come apart very easy.
- Repeat these steps with the other half of the dough.
- Once done, bake in the oven for about 15 minutes. Watch them carefully though, because everyone’s oven is a bit different and they can easily burn.
- Once the edges look browned, pull the pans out and carefully flip the pieces over.
- Bake for another 5-7 minutes, or until the pieces are crunchy.
Recipe Notes
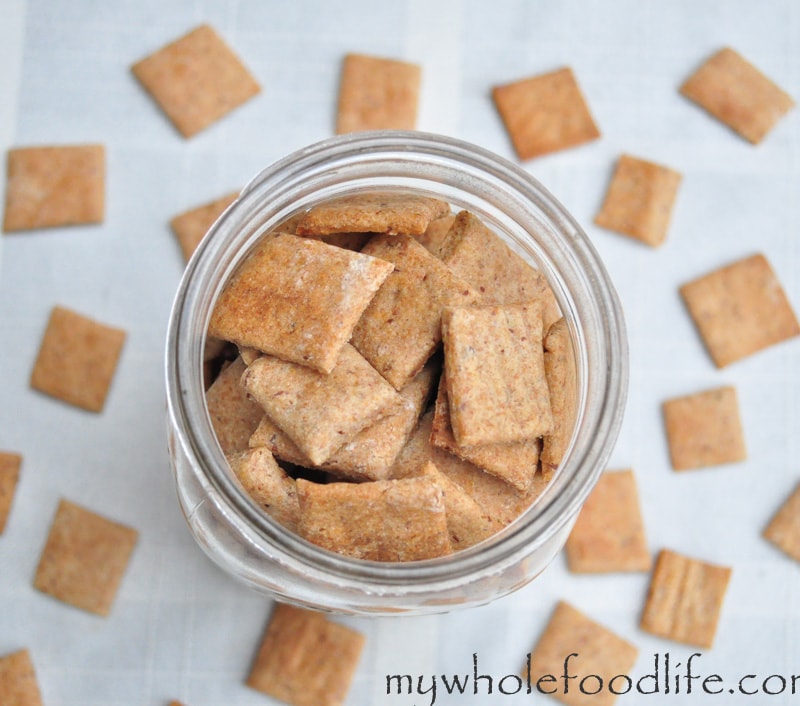
I got far more crackers in my batch than you would get in a box of store bought wheat thins. Way cheaper to make too! I store mine in a glass jar in the pantry. They should last a couple weeks. To keep them crispy, scatter a bit of rice at the bottom of the container. The rice should help absorb the moisture and keep the crackers crisp. Enjoy!