Grain Free Pumpkin Tart

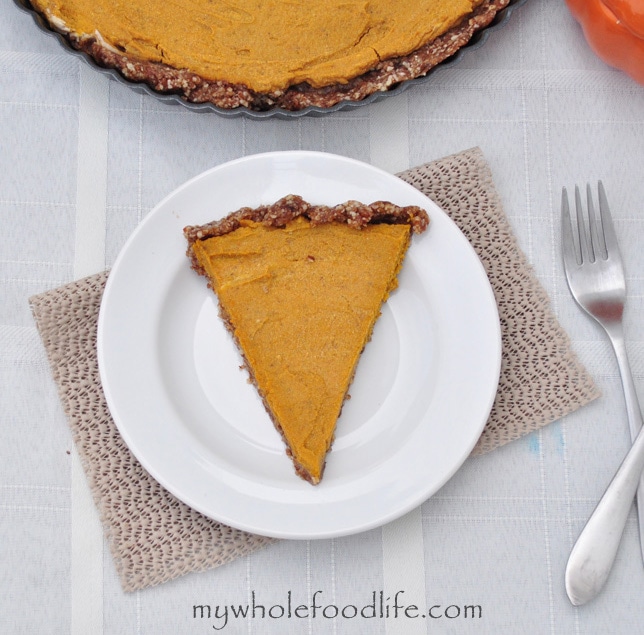
I love pumpkin pie.  One of my very first recipes on this blog was for a pumpkin pie that called for tofu.  This year, I wanted to create a soy free pumpkin pie.  This was my first experiment and it went well.  This isn’t exactly a pie, but it’s delish and grain free.  I still have plans for a gluten free and vegan pumpkin pie in the future too, but this pumpkin pie tart is a contender for anyone looking for a pumpkin pie dish who is also in the mood for the creaminess and richness of a tart.

Pumpkin Tart FG sharp watermark

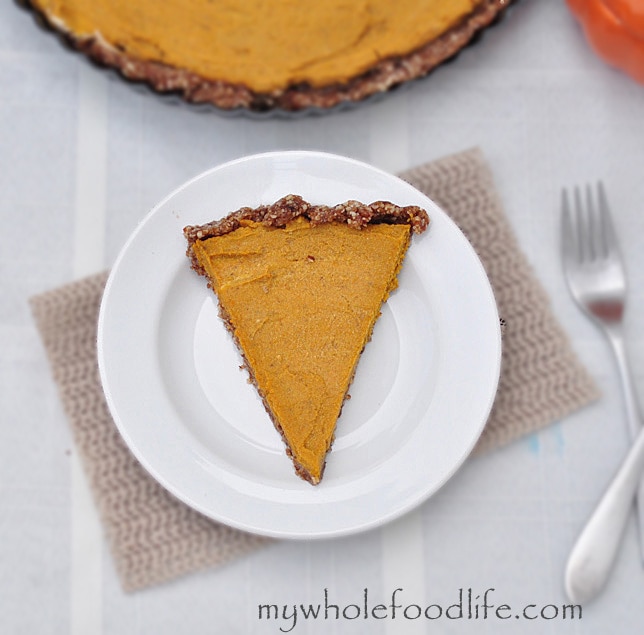
My daughter Meadow, who claims to dislike all things pumpkin, ate this.  In fact, both my girls enjoyed it.  If you are not a fan of coconut milk, please understand that you cannot taste the coconut in this recipe.  The pumpkin and warm spices totally cover it up!  Kind of like in my Pumpkin Ice Cream.

Grain Free Pumpkin Tart

Grain Free Pumpkin Tart

Prep Time 30 min Cook Time 30 min

Ingredients

    For the crust

    For the filling

    Instructions

      For the crust

      1. In a food processor , combine all the crust ingredients except the dates and pulse into a course ground consistency.
      2. Then add in the dates and pulse until a dough starts to form. You may need to add a tiny bit of water, but I did not.
      3. Once the dough is formed, press it into a greased tart pan . Stick in the fridge to firm up.

      For the filling

      1. The night before you make this, place your can of coconut milk in the fridge.
      2. In the food processor , combine all the ingredients for the filling except the coconut cream. Mix well.
      3. Open your chilled can of coconut milk and scoop out the white solid part.
      4. Discard the water leftover, or save it for smoothies.
      5. Spoon out 1/2 cup and put in the mixer bowl.
      6. Whip the cream in a mixer to get some air in it.
      7. Once it looks more like whipped cream, slowly add in the pumpkin mixture by folding it in.
      8. Do not mix the two together. Just keep folding the pumpkin mixture in until all are combined.
      9. Spread the mixture into your tart shell and chill in the fridge for at least 30 minutes.

      by

      Recipe Notes

      You can save the leftover coconut cream from the can, for topping the tart if you wish. This should last at least 5 days in the fridge. Enjoy!

      Maca Energy Bars (Vegan, Gluten Free and Paleo)

      Maca Energy Bars.  When you start reading all about eating healthy, there are certain foods that come up.  Kale, chia seeds, goji berries and maca are just some of them.  I was curious about maca root powder, so I had to get a bag to try out.

      It is pretty pricey, but it lasts a long time.  Kind of like the chia seeds. Maca root is a tuber, kind of like a potato.  It is very well known as a natural energy booster.  It can also help with hormonal issues such as menopause and fertility.

      Maca is rich in B vitamins as well.  So I decided to make an energy bar with it.  This energy bar is not only vegan, but grain free and gluten free too.


      Maca Energy Bars

      Maca Energy Bars

      Maca Energy Bars

      Prep Time 10 min Cook Time 10 min

      Ingredients

      Instructions

      1. In a food processor , grind the almonds into a course consistency. 
      2. Add them to a bowl with the sunflower seeds, maca powder, flax meal, pepitas, chia seeds and salt. 
      3. In a saucepan, combine the maple syrup, almond butter and coconut oil. 
      4. Mix until all are well combined. 
      5. Add it to the bowl with the dried ingredients. 
      6. Tear a sheet of parchment slightly bigger than an 8X8 pan .
      7. Line an 8X8 pan with the paper. 
      8. Spread in the mixture and pack down tight . 
      9. Place in the fridge to set.  About 1 hour.

      by

      Recipe Notes

      I got 8 bars out of my batch. Store them in the fridge or even freeze them for longer storage. Enjoy!

      Apple Spiced Refrigerator Jam

      You need to try this Apple Spiced Refrigerator Jam.  Everyone likes a little jam once and awhile.  Most store bought jams contain too much processed sugar.

      Did you know you can easily make your own jam recipe without processed sugar, pectin or canning?  I already have Blueberry Chia Jam on the blog.

      Since it’s almost fall, I thought I would make one that incorporated those flavors.  This apple spiced jam recipe came out great.


      Apple Spiced Refrigerator Jam Watermark

      This is it and it couldn’t be any easier!  I used chia seeds to help gel up the spread.  This will literally take minutes to make.  Spread it on toast, swirl it in yogurt, or even use it as a pancake topping!  It would be great in overnight oats as well.  Yum!

      Apple Spiced Refrigerator Jam

      Apple Spiced Refrigerator Jam

      Prep Time 10 min Serves 8 oz.     adjust servings

      Ingredients

      • 2 apples peeled and cored (I saved the peels because my daughter likes to snack on them. Any apples will do. I used gala.)
      • 1 tsp cinnamon
      • 1/2 tsp nutmeg
      • 1/4 tsp ginger
      • 1/4 tsp cloves
      • 2 T maple syrup (This is optional. Taste the mixture and if it's not sweet enough, add the syrup.)
      • 2-3 T chia seeds

      Instructions

      1. In the food processor , blend up the apples.
      2. Then add in the remaining ingredients and mix well.
      3. Put the jam in a covered container and set it in the fridge to set up. Takes about 30 minutes to an hour.

      by

      Recipe Notes

      This made 8 oz of jam. I store mine in mason jars , but you can use any container. It should last a few weeks in the fridge and you can also freeze it for longer storage. Enjoy!

      Chocolate Peppermint Bites

      My husband was a huge fan of junior mints.  They are kind of off limits now that he is vegan and eats no processed foods.  So I decided to try and make a minty treat he could enjoy. Chocolate peppermint bites.  These Chocolate Peppermint Bites came out great, and you can think of them like a a homemade junior mint recipe!

      chocolate peppermint bites watermark 2

      I think he was pretty pleased with the way these turned out.  They are so easy to make too.  Just a few minutes to throw together and then some time to chill in the fridge.  I rolled mine into big balls, but you can do bite sized ones as well.  These would be a perfect dessert for holiday parties too!

      Chocolate Peppermint Bites

      Chocolate Peppermint Bites

      Chocolate Peppermint Bites

      Serves 12 large peppermint balls     adjust servings

      The perfect treat for holiday parties!

      Ingredients

        For the balls

        For the chocolate coating

        Instructions

        1. In the food processor , mix the shredded coconut and the dates.
        2. Once they are blended, add in the peppermint extract and milk.
        3. Carefully roll the mixture into balls. It will be loose and feel like it doesn’t want to stick together, but trust me, it will firm up in the fridge.
        4. Set the balls into a small baking sheet covered with parchment paper .
        5. Put the balls in the fridge to chill. I waited about 30 minutes.
        6. While the balls are chilling, make the chocolate mixture.
        7. Heat all the chocolate ingredients in a saucepan , and stir until smooth.
        8. Using two forks, roll each ball in the chocolate mixture and set back on the baking sheet .
        9. Once done with all the balls, place them back in the fridge to set up.

        by

        Recipe Notes

        I got about 12 large balls out of my batch. You can store them in the fridge or freezer. Enjoy!

        Apple Pie Fruit Leathers

        My kids love fruit leathers, but they are so expensive at the store.  So now I make my own.  It’s so easy and you can add in whatever fruits and spices you like.  I have peach fruit leathers on my blog already, and now I can add these to the list.

        Apple Leather watermark

        The house smells amazing when these are cooking, kind of like when I make my crock pot applesauce.  The best part is that you probably already have all the ingredients in your own cabinets!  I used applesauce to make mine, but you can most certainly use real apples and puree them first.  Think about it though.  When your store has a sale on applesauce, you can stock up and make these.  It would save a lot of money and make your kids happy too. I used a dehydrator to make mine, but you can certainly try this in the oven as well.  You just need to keep an eye one them.

        Apple Pie Fruit Leathers

        Apple Pie Fruit Leathers

        Prep Time 20 min Cook Time 7 hr Serves 20 fruit leathers     adjust servings

        Ingredients

        Instructions

        1. If using an oven, preheat to the lowest setting or 135. 
        2. Put all ingredients in a bowl and mix well. 
        3. Line your baking sheets with parchment and spread the mixture out evenly. 
        4. Bake for about 4-6 hours, depending on how low the temp your oven will go. 
        5. If you are using a dehydrator , line the trays with parchment as well.  You can use the dehydrator sheets as well, but I think parchment is much cheaper and works great. 
        6. I baked mine in the dehydrator at 135 for about 6-7 hours. 
        7. Once it feels tacky, it’s pretty much done.  I got about 20 fruit leathers out of my batch.  Enjoy!

        by

        16 Whole Food Recipes for Condiments, Dips and Spreads

        When switching to a whole food diet, condiments, dips and spreads are the hardest things to find clean.  I usually make my own.  So here is a roundup of every recipe I have so far.

        hummus watermark

        Hummus

        teriyaki sauce watermark 2

        Teriyaki Sauce

        chia jam watermark copy

        Fruit Spreads

        dressing watermark

        Italian Herb Dressing

        dressing 3 watermark copy

        Balsamic Vinaigrette

        ketchup-3-1024x798

        Homemade Ketchup

        sauce 2

        Easy Crock Pot Tomato Sauce

        ranch 1

        Dairy Free Ranch Dressing

        pb

        Homemade Peanut Butter

        dressing

        Healthy Honey Mustard

        bbq sauce

        Homemade BBQ Sauce

        beans 1

        Homemade Re-Fried Beans

        coconut butter watermark

        Coconut Butter

        dip

        Healthy White Bean Pesto Dip

        Hope these recipes can help you transition away from store bought versions!  Enjoy

        Toasted-Sesame-Dressing-My-Whole-Food-Life-1

        Toasted Sesame Asian Dressing