Grain Free Blueberry Tart (Vegan)

Grain Free Blueberry Tart.  Today we got our co-op basket.  There was an optional add-on for blueberries so I took it.  12 pints of organic blueberries!

We gave some to my in-laws and we took the rest.  My older daughter just LOVES blueberries.  She ate a whole pint in one sitting.  I can’t say I blame her!

They are so good!  I have been wanting to do a fruit tart recipe for a while now, so I thought I would make a grain free blueberry tart. I can tell you my family was not disappointed.


Grain Free Blueberry Tart


It was awesome!  This tart is not only grain and gluten free, it’s also vegan! 🙂  It’s super easy to make too.

Grain Free Blueberry Tart

Grain Free Blueberry Tart

Prep Time 20 min Cook Time 10 min Serves 12 slices     adjust servings

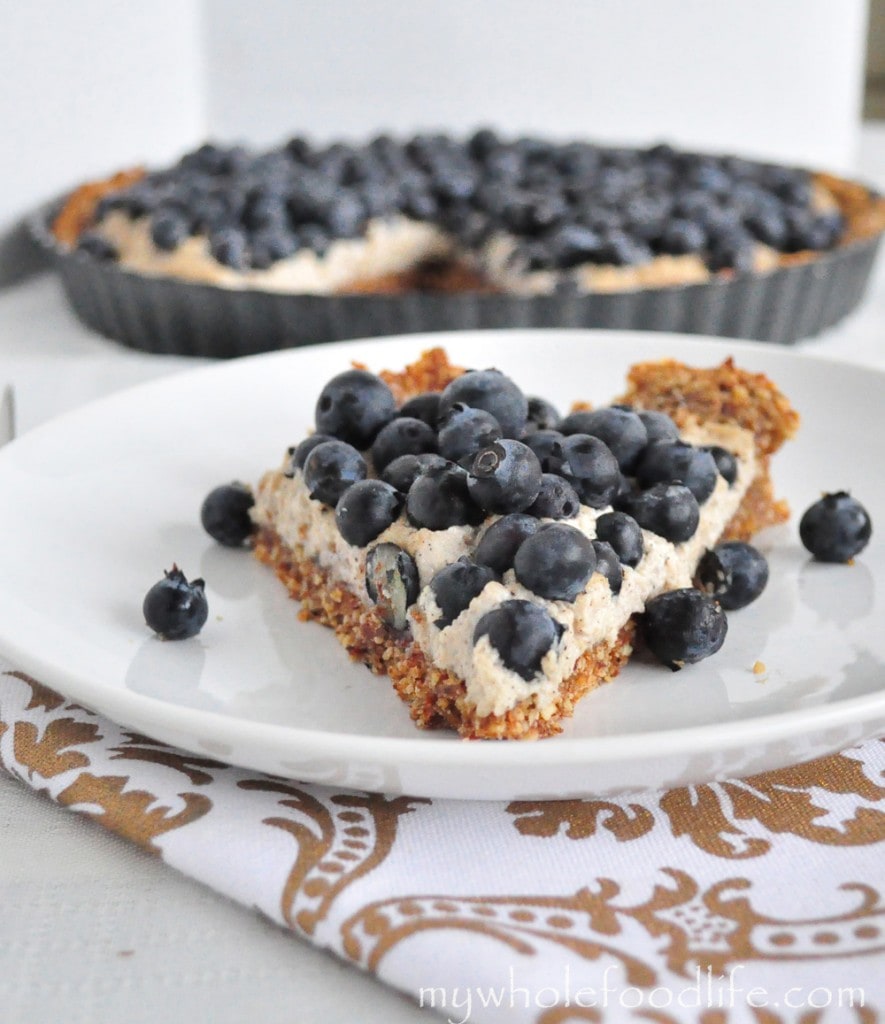
A no fuss dessert that looks fancy, but is really easy to make!

Ingredients

Instructions

  1. Preheat oven to 350.
  2. In the food processor, grind the almonds.
  3. Once they are ground to a course consistency, add in the dates, coconut oil and a small amount of water.
  4. Pulse until a dough forms.
  5. Press the mixture into a greased tart pan.
  6. Bake in the oven for about 10 minutes.
  7. While it is baking, drain the soaked cashews and throw them in the blender with the maple syrup and vanilla. You can probably use a food processor for this as well.
  8. Blend up the cashews until they are a smooth cream. You may need to add a small amount of water or milk to get it smooth. You will want a cream-like consistency.
  9. Spread the cashew cream over the tart crust and top with blueberries.

by

Recipe Notes

I would imagine this would keep in the fridge for a week at least. If you can get it to last that long! Enjoy!

Maple Pecan Cookies

I have had it on my mind to make these maple pecan cookies for a while now and I finally got around to it.  These maple pecan cookies came out really tasty!  Maple and pecans are two of my favorite things, so why not throw them together and make a maple and pecan thumbprint cookie.

pecan ccokies 1 watermark

These are made with whole grains and no refined sugar.  I also added extra crushed vanilla bean and cinnamon to make the cookie appear sweeter than it actually is.  Did you know that spices can do that?  I was pretty surprised to first read that, but now I swear by those vanilla beans.  They are amazing!  This is a great recipe to do with your kids as well.  Since my daughter is only 3 1/2, her job is to push the pecans into the middle of the cookie.  I used raw pecans for my recipe, but they would be equally delicious with my Candied Pecans as well.

Maple Pecan Cookies

Maple Pecan Cookies

Prep Time 10 min Cook Time 13 min Serves 20 Cookies     adjust servings

Ingredients

Instructions

  1. Preheat oven to 350.
  2. In a food processor, grind up the 1/2 cup pecans (measure before grinding.)
  3. Add the pecans to a bowl with the rest of the dry ingredients.
  4. Add all the wet ingredients into another bowl.
  5. Add dry to wet and mix only until combined. The dough will be a bit thick and sticky.
  6. Roll into balls and place on a lined baking sheet.
  7. Press the cookies down flat with the palm of your hand.
  8. Press a pecan into the middle of each cookie.
  9. Bake in the oven for about 13 minutes.

by

Recipe Notes

They should last at least a week, but you can refrigerate or even freeze to make them last longer. Enjoy!

Italian Herb Dressing Recipe

Italian Herb Dressing.  When I asked you awhile back about what kind of healthy dressing recipes you would like to see, a popular answer was a vegan Italian dressing.

I had already created a Balsamic Vinaigrette.  So I created an vegan herb dressing for you.


Italian herb dressing


This healthy salad dressing is super easy to make as well.  I used dried herbs, because that is what I had on hand.  Feel free to use fresh ones as well.

This dressing would make a great marinade as well.  I am thinking of marinating some vegetable kabobs in this and then grilling them.  Yum!

Italian Herb Dressing Recipe

Italian Herb Dressing

Prep Time 5 min Serves 1 cup     adjust servings

Ingredients

  • 1/3 cup olive oil
  • 1/3 cup white wine vinegar
  • 1 tsp garlic powder
  • 1/2 tsp thyme
  • 1/2 tsp oregano
  • 1 tsp basil
  • 1 1/2 tsp honey or maple syrup (I used honey)
  • pinch salt

Instructions

  1. Mix all the wet ingredients in a bowl .
  2. Mix all the dry in another. 
  3. Add wet to dry and whisk until combined.

by

Recipe Notes

Another way you can mix is to throw everything in a covered container and shake well. Keep in mind that since this is a homemade dressing, the oil will try to solidify in the fridge. If you plan on using the dressing, just pull it out a few minutes before you need it and then shake well before using. I got close to 1 cup of dressing. It should last in the fridge a couple weeks. Enjoy!

Copycat Mary’s Gone Crackers!

Copycat Mary’s Gone Crackers is the recipe today.  When you decide to eat a diet of just wholesome foods, it’s hard to find a cracker that fits this criteria.

It was quite disappointing to read labels and find most crackers contained added sugar or highly processed grains.  I also keep wanted to find a healthy cracker that my picky toddlers would eat.

I finally found a good one in Mary’s Gone Crackers.  They are organic, vegan, gluten free and non GMO verified.  I love them and so do my kids, but at $4 a box, they can be quite pricey.

Since we go through them so fast, I thought I would try making a homemade Mary’s Gone Cracker version.  They came out really good!

You also should try my Homemade Fig Newtons and my Homemade Nutri-Grain Bars.


Copycat Mary's Gone Crackers

They are pretty easy to make and you can add in your own ingredients to customize your favorite flavors.  It’s also a great recipe to do with your kids.  Not really a lot of messy ingredients or measuring.

I find when I get my kids involved in the prep work, they are more likely to eat the food.

For starters, I just did a multi-seed cracker.  I really love their herb flavor, so that will be my next batch.  I also threw some chia seeds because they are so good for you.

I try to toss them in everything from baked goods to smoothies and in between.  To help keep costs down, I bought all of the ingredients out of the bulk bins at Whole Foods.  Here is my recipe.

Copycat Mary’s Gone Crackers!

Homemade Mary’s Gone Crackers!

Prep Time 15 min Cook Time 30 min Serves 25-30 crackers     adjust servings

Ingredients

Instructions

  1. Preheat oven to 350.
  2. In a food processor , combine the quinoa and rice into a mushy consistency.
  3. Add in all the seeds and salt with a bit of water and pulse until you have a mushy ball.
  4. Get out a sheet of parchment paper about the size of a baking sheet and lay it on the counter.
  5. Take half of the mixture and place it on the parchment.
  6. Using a rolling pin and some plastic wrap, roll out the mixture, putting the plastic wrap between the rolling pin and the mixture. That way, you can roll it out without it getting stuck.
  7. Roll as thin as possible and then transfer the parchment and rolled mixture onto a baking sheet.
  8. Repeat the same steps with the second half.
  9. Bake in the oven for about 15 minutes.
  10. Pull them out and carefully flip them and bake for another 12 minutes.
  11. When they are done, carefully break them into bite sized pieces and bake for an additional 10 minutes or until the pieces are crispy.

by

Recipe Notes

I got about 25 – 30 crackers out of my batch. They should keep for a week or so. Enjoy!

Quinoa Salad with Roasted Beets

I have been trying hard to get more beets into my diet.  They are so good for you.  I tried blending them up in my vitamix, but couldn’t get them down.  It was not very good.  Maybe they are one of those things you have to get used to?  Coconut was like that for me.  I used to hate it,  but now I can’t get enough!  I stumbled across this recipe on Pinterest.  It’s from Gluten-Free Goddess and it was amazing!  Check out her blog if you get a chance.  Lots of yummy recipes and many are vegan.

beet salad watermark

I have made roasted beets in the past and I thought they were delicious.  So I decided to give this a go.  I am so glad I did!  I did change a few things in the recipe, but I mostly kept it as is.  I am not a fan of oranges in salad, so I omitted those.

Quinoa Salad with Roasted Beets

Quinoa Salad with Roasted Beets

Prep Time 10 min Cook Time 1 hr

Ingredients

  • 3 cups cooked quinoa
  • 2 beets peeled (greens removed) and cubed
  • 2 T avocado or coconut oil
  • salt to taste
  • 1/4 cup olive oil
  • Juice of half a large orange or 1/4 cup orange juice
  • 2 tsp soy sauce or tamari (I used organic soy)
  • 1-2 tsp balsamic vinegar
  • 1/2 tsp garlic powder
  • 1 T raw honey or maple syrup
  • 3-4 handfuls of baby spinach
  • salt and pepper to taste

Instructions

  1. Preheat oven to 375.
  2. Place the beets on a lined baking sheet and drizzle with the 2 T coconut or avocado oil.
  3. Sprinkle with sea salt.
  4. Roast in the oven for about 45 minutes.
  5. While the beets are roasting, you can cook the quinoa according to the package instructions. I actually cooked the quinoa the day before.  If you buy your quinoa in bulk, cook it 2 parts water per 1 part quinoa. 
  6. Once the beets are done roasting, let them cool.
  7. Once cooled, combine the beets and quinoa in a large bowl. 
  8. In a small bowl, combine: olive oil, orange juice, soy sauce, balsamic vinegar, garlic and honey.
  9. Whisk into a dressing.
  10. Pour over the beets and quinoa.
  11. Fold in the spinach.
  12. Now salt to taste and that’s it.

by

Recipe Notes

We got about 4 servings. Enjoy!

Clean Eating Peanut Butter Cups (Vegan)

Clean Eating Peanut Butter Cups.  Let’s face it.  We all need a little something sweet every once and a while.  Who says you need to give up peanut butter cups?  While I will never eat Reese’s Peanut Butter Cups again, I will have a homemade peanut butter cup every now and then!


clean eating peanut butter cups


I made these with homemade peanut butter and also almond butter.  Both worked out well, but I think I liked the peanut butter cups better.  Most homemade peanut butter cup recipes call for powdered sugar.  This does not.  I just dropped some freshly made peanut butter in the middle of these.

So much better that way and also much less sugar too!  The chips I used are from Enjoy Life.  You can also make your own chocolate with 1 cup coconut oil, 1/2 cup cacao powder and a few tablespoons of liquid sweetener.  Or you could melt a couple of bars of dark chocolate with a bit of milk.  Any way works.

The Enjoy Life chips have a pretty clean ingredient list and are gluten free as well.  They do contain a bit of processed sugar which is why I gave some other options.  I have tried the chips and the coconut oil chocolate.

I chopped one of these homemade peanut butter cups and ate it in my 5 Minute Banana Ice Cream.  OMG!  Best.Thing.Ever.  A healthier dessert option.

If you don’t want to use chocolate chips, you can use my 3 ingredient chocolate recipe in this video.

Looking for more candy recipes?


Clean Eating Peanut Butter Cups

Clean Eating Peanut Butter Cups

Prep Time 10 min Cook Time 20 min Serves 12     adjust servings

It's a healthier version of a Reece's Cup.

Ingredients

  • 1 bag chocolate chips (I used Enjoy Life gluten free and soy free chips)
  • 3/4 cup almond milk
  • Roughly 3/4 cup peanut butter or almond butter

Instructions

  1. Get out a couple of muffin tins and line them with paper or silicone cups. . I used standard sized muffin pans, but the mini cups would work well too.
  2. Using a double boiler, melt the chips and milk in a glass bowl, stirring constantly to get the lumps out. It makes a great arm workout.
  3. Once the chocolate and milk have combined and are smooth, pour a little bit of chocolate in the bottom of each muffin cup.
  4. Place them in the freezer for about 20 minutes to set.
  5. When they are hard, pull them out and put a dollop on nut butter on top of each one.
  6. Fill the remaining cup with chocolate.
  7. Repeat until all the cups are filled.
  8. Place back in the freezer.

by

Recipe Notes

I would give them a few hours to set. Actually, I store mine in the freezer as well. I think they would get too soft in the fridge. That’s it!